|
||||||
|
|
|
Device Configuration Guides
3CX PBX Phone System for Windows
3CX Phone System is a software-based IP PBX for Windows which replaces traditional PBX hardware phones. It is based on the SIP standard and supports standard SIP software / hardware phones. It allows calls to be made via a VOIP service provider or via the regular PSTN. Easy to install and configure, it includes a web-based configuration interface, voice mail, auto attendant, call hunting and other features. Both commercial and a free edition are available.
STEP 5 VoIP Provider Account Details Enter a unique Authentication ID, Authentication Password, and Number for this InPhonex account. The Authentication ID is determined by you and must be unique to InPhonex. Other VoIP provider accounts that you create must use a different authentication ID External Number: This is where you would enter your DID phone number. A DID number is optional, and not required to use InPhonex with 3CX
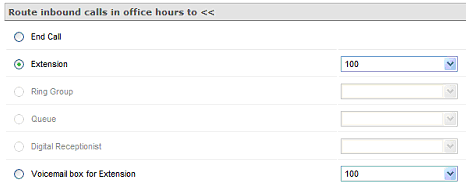
STEP 6 Route Inbound Calls in Office Hours to: These settings may remain at their default, however additional configuration is recommended. This section allows you to specify how an inbound call should be routed during office hours. You can choose to route inbound call to:
* Features available in select 3CX versions only.
STEP 7 Route Inbound Calls out of Office Hours: These settings may remain at their default, however additional configuration is recommended. You can specify that an incoming call be routed differently if it is received outside office hours. You can select from the same routing options. Click on the ‘Specify Office Hours’ button to define your office opening hours.
STEP 8 Select the ‘Finish’ button to register the line. Confirm the line is ‘Registered’ by selecting the ‘Line Status’ link from the left menu. A ‘Green’ light will indicate a successfully registered line. A ‘Red’ light indicates the line is not registered. If not registered, return to Step 5 and confirm your account details.
Congratulations, you have successfully configured InPhonex for use with 3CX Phone System!
STEP 9 Please refer to the 3CX Administration Manual for additional configuration information.
|
|||||||||||||||||||||
|
Our Home Phone Service includes Internet phones with free Internet calling and unlimited US and Canada plans. We offer prepaid phone service and International DID numbers using our voice over IP system and an analog telephone adaptor (ATA). The solutions are designed for home phone service, business phone service, call shops, telemarketing firms and cyber cafes. InPhonex is proud to support Internet telephony equipment (IP Phones) including Sipura 2000, Sipura 3000, Cisco 186, Linksys PAP2 and other SIP phone adaptors. We also support Asterisk PBX, Trixbox and offer turn-key VoIP Reseller business opportunities to let entrepreneurs and businesses resell voice over Internet (VoIP) under their brand name. Copyright © InPhonex
|


